React学习笔记
jsx 本质
再js里写html => 编译为 ReactDom对象,
使用React.creatElement() 同样可以创建ReactDom对象
jsx里的模板解析
- String, Number: 直接渲染
- Boolean: 不渲染
- null, undefined, function: 不渲染
- Object:只能渲染ReactDom 对象
- Array: 每一项都单独渲染
- 表达式: 会运行
事件
1 | <p onClick={ handleClick.bind(this) }>App</p> |
- this 最好用
bind指向组件实例, 否则指向undefined
传参
1 | <p onClick={ handleClick.bind(this,a,b) }>App</p> |
- 事件对象默认在最后一个参数
- 事件对象是React包装的
SyntheticBaseEvent- 原生事件对象 =
SyntheticBaseEvent.nativeEvent
- 原生事件对象 =
响应式
setState
1 | this.setState({}, callback) |
传入一个对象,来和state 浅合并
- 通过
Object.assign合并
- 通过
调用更新方法,更新视图
- 不管数据是否更新
- 解决方法,组件基础
PureComponent
是一个异步方法, callback 是promise完成的回调
不要在render里调用setState
PureComponent 有一个问题
如果更新引用类型,但是地址没变,也不会触发更新
1 | this.state.arr.push(123); |
props
在react中,所有写在组件上的属性和子节点都被当作props
props 验证
propTypes
- 手写
1 | // props验证 |
- 利用库
proptypes
1 | import proptypes from "proptypes"; |
props 默认值
1 | // props默认值 |
插槽
- 通过
props.children得到一个数组,里面包括所有插槽 - 通过传一个函数给子组件,实现作用域插槽
1 | scopeSlot={( |
context
类似于vue的provider 和injected , 祖孙传值。
子组件必须用父组件传来的context,不能自己创建。
1 | //GrandFather.js |
Ref
只有在componentDidMount 之后才能获取到
可以获取dom 或者 类组件实例
函数组件无法获取到
this.refs
1 | <div ref="container"></div> |
createRef/useRef
1 | const container = React.createRef() |
样式
class类名设置
- 必须写成
className - 类名和样式写在css文件里
- 必须接受一个字符串
style行内样式
- 必须写成对象
js引入css是全局生效的, 所以要css模块化
手写
命名css
comName.module.css导入
import comStyle from './css/comName.module.css'使用
className={ comStyle.xxx }
css文件里只有类选择器才会被导出
- 库
classnames
1 | import classnames from 'classnames' |
用法同vue
如何配合css模块化?
1 | import classnames from 'classnames/bind' |
生命周期
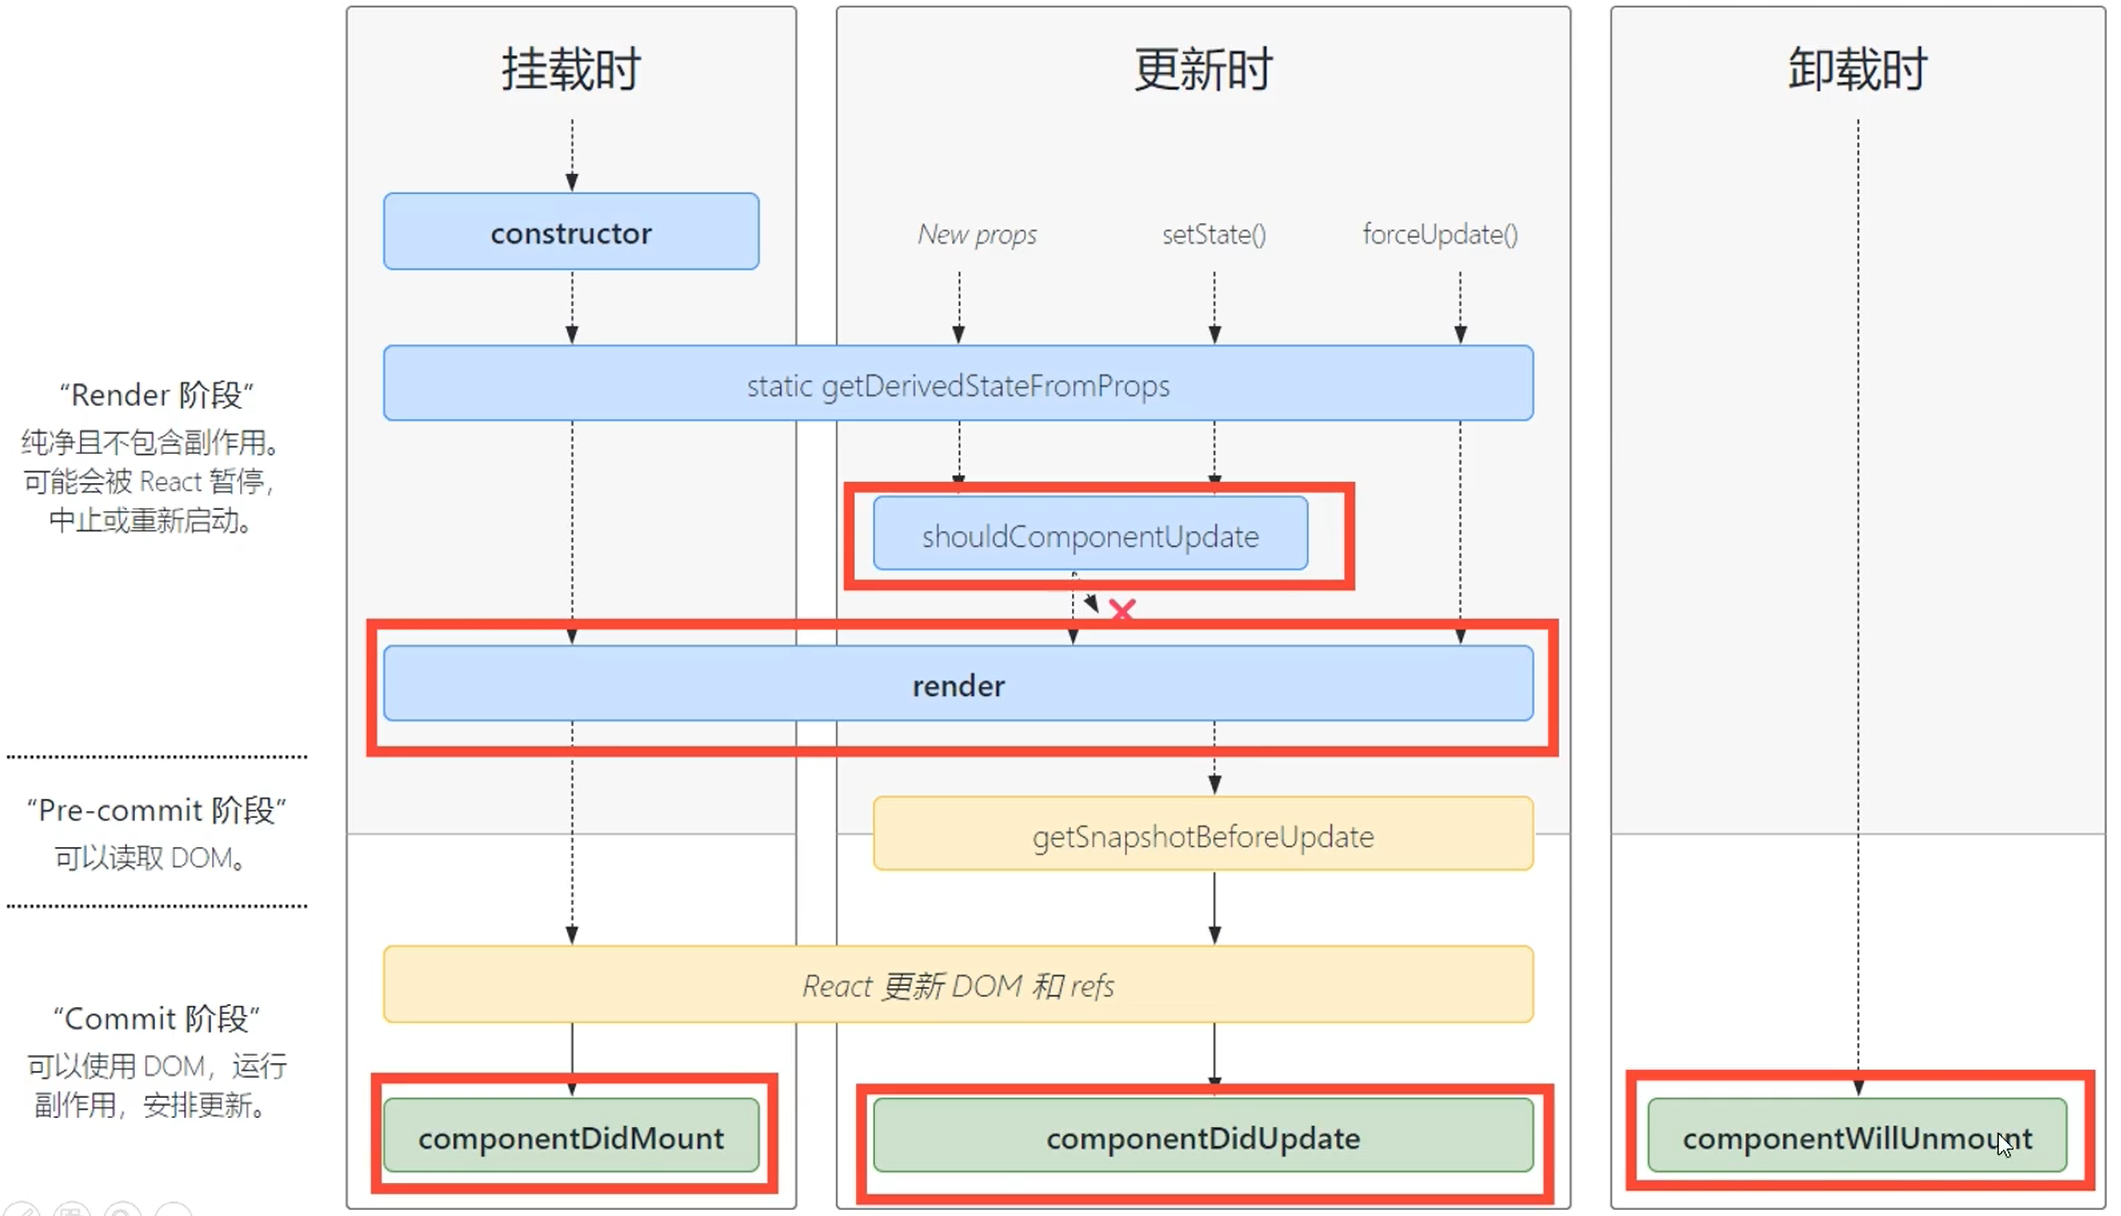
static getDerivedStateFromProps(props, state)
它应该返回一个对象来更新 state,或者返回 null 就不更新任何内容。
componentDidMount
如果您定义了 componentDidMount 方法,当您的组件被添加(安装)到屏幕上时,React 将调用该方法。这是开始获取数据、设置订阅或操作 DOM 节点的常用位置。
如果您实现了 componentDidMount,通常还需要实现其他生命周期方法,以避免出现错误。例如,如果 componentDidMount 读取了一些状态或道具,你还必须实现 componentDidUpdate 来处理它们的变化,以及 componentWillUnmount 来清理 componentDidMount 正在做的事情。
在 componentDidMount 中立即调用 setState,但最好还是尽量避免。它会触发一次额外的渲染
componentDidUpdate(prevProps, prevState, snapshot?)
@return undefined
在更新props和重新渲染组件后调用
componentDidUpdate 内部的逻辑通常应封装在比较 this.props 和 prevProps 以及 this.state 和 prevState 的条件中。否则,就有可能产生无限循环。
react里的更新问题
vue
会收集依赖, 做到最小范围更新
React
没有依赖收集,会更新整个组件树,即会把子组件一起跟新
子组件若用PureComponent则可以避免
##严格模式
<React.StrictMode>
1 | const root = ReactDOM.createRoot(document.getElementById('root')); |
只在开发时生效,生产时会去除。作用:
- 检测一些危险操作(废弃或不推荐的api)
- 每个生命周期执行两次,以查找由于缺少 Effect 清理而引起的错误
函数式组件
没有生命周期
没有this
通过hook完成各种操作(组合式api)
useState(value)useEffect(fn, [])- 不传第数组相当于
componentDidMount和componentDidUpdate - 传一个空数组 相当于
componentDidMount - 传依赖数据 相当于
watch且开启immediate: true
- 不传第数组相当于
useMemo(fn, [])- 相当于
computed,也拥有缓存功能 - 有时也会缓存一个固定的对象,防止重新生成从而优化性能。
- 相当于
useCallback(fn, [])- 缓存一个方法
useRef1
2
3const div = useRef();
...
<div ref={div}>Hello World</div>useContext1
2
3
4
5import Context1 from './Father.jsx'
import { useContext } from 'react'
...
// 更简便的消费context
const ctx1 = useContext(Context1);
函数本身相当于render函数
props在函数第一个参数接收
- 函数式组件相当于render函数,不能直接在render函数里修改state
- 函数式组件更新规则相当于PureComponent,必须地址改变才能检测到更新
React 性能
React没有像vue一样的依赖收集可以精准定位需要更新视图的地方。所以React的更新时diff要比较的范围更大更耗时。包括整个子树,尽管部分子树没有数据改变。
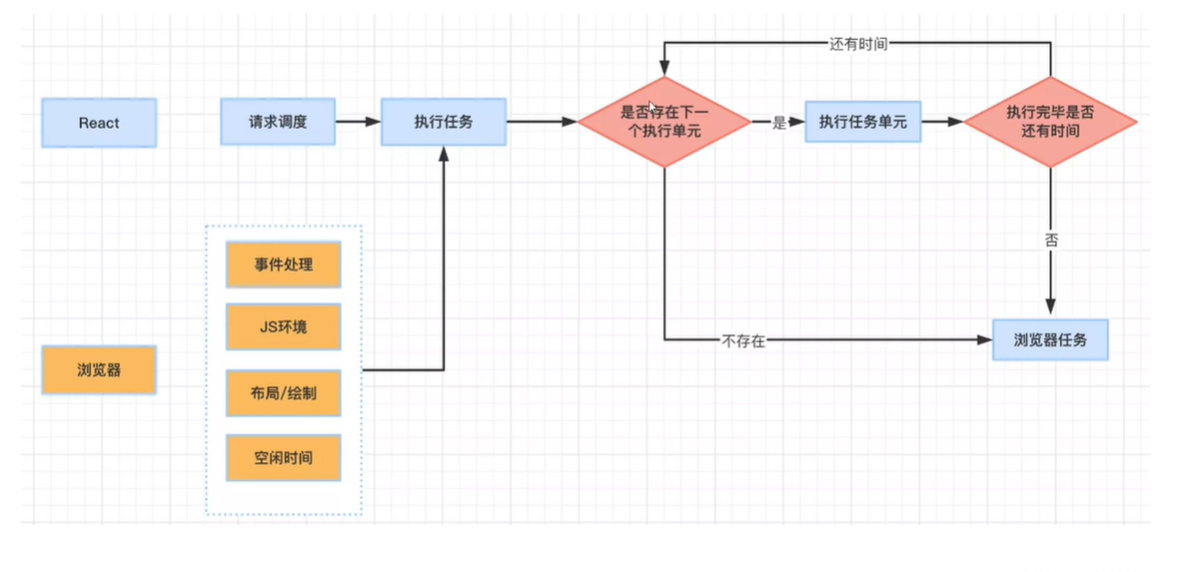
那么解决性能问题的方案就是Fiber —— 一种时间切片策略 :
先计算一部分,再更新这部分视图。下一帧的时间继续这个过程。
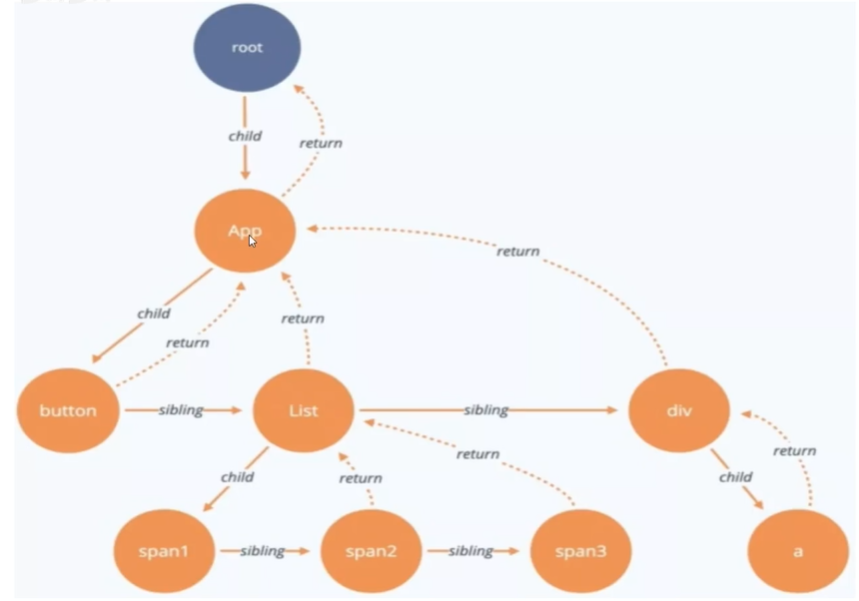
Fiber
每个组件被转化为Fiber结构的对象,从而获得从中断位置继续计算的能力。
每个Fiber结构拥有几个指针指向父组件、子组件、兄弟组件
React.memo
高阶组件,用于缓存一个组件。防止父组件跟新导致子组件一起跟新。
1 | import React from 'react' |
Router
- React-router 服务端渲染
- React-router-dom 浏览器端
- React-router-native RN开发
使用步骤 — 第一种
用
BroserRouter或HashRouter包裹根组件1
2
3<BrowserRouter>
<App />
</BrowserRouter>用
Routes组件定义路由显示区域 — 类似与<router-view>- V5版本是 switch
用
Route组件定义路由规则- 接受两个props:
- path 指定路由匹配的地址
- Component 指定此路由匹配的组件
1
2<Route path="/path1" Component={Page1}></Route> /*v5版本写法,v6也兼容*/
<Route path="/path2" element={<Page2></Page2>}></Route>使用
NavLink或Link组件定义跳转链接都被渲染为a标签
NavLink:在当前匹配的a标签增加 active 类名
1
<Link to="/path1"}>{user.name}</Link>
Routes里只能放Route,Route也只能放Routes里
使用步骤 — 第二种
这种类似vue-router
createBrowserRouter1
2
3
4
5
6
7
8
9export default createBrowserRouter([{
path: '/',
element: <App></App>,
children: [
{ path: 'page1/:id', element: <Page1 /> },
{ path: 'page2', element: <Page2 /> },
{ path: 'page3', element: <Page3 /> }
]
}])<RouterProvider>
1 | ReactDOM.createRoot(document.getElementById('root')).render( |
<Outlet>等同于<router-view>
路由参数
- 声明
1 | <Route path="/path1/:id" element{<Page1></Page1>}></Route> |
- 获取
| Router版本 | params参数 | query参数 | location信息 |
|---|---|---|---|
| V6 | useParams | useSearchParams | useLocation |
| V5 | this.props.match.params | this.props.location.search | this.props.location.state |
useParams:
const { id } = useParams()useSearchParams:
const [searchParams, setSearchParams] = useSearchParams()searchParams是一个对象拥有size属性,getgetAllhas方法setSearchParams(URLSearchParamsInit, NavigateOptions )是一个方法,用于修改query参数
1
2
3
4setSearchParams({
name: ['aa','11'],
sex: 'famale'
})useLocation:
const location = useLocation()location是一个对象拥有hashkeypathnamesearchstate属性
编程式路由导航控制
| Router版本 | 跳转方法 |
|---|---|
| V6 | useNavigate() 或 <Navigate> |
| V5 | this.props.history.push() |
useNavigate:
navigator(To, NavigateOptions?)navigator(delta: Number)表示前进或后退detal步
1
2
3
4
5
6
7
8
9
10
11
12
13const navigator = useNavigate();
navigator({
pathname: '/page3',
search: '?a=1&b=2&c=3',
hash: '#hash_value'
}, {
replace: true, //替换历史记录
state: { //meta数据, 在 useLocation().state 里可以获取
needAuth: true
},
relative: 'route', //设置导航的相对类型 'route'默认 | 'path'
preventScrollReset: true, //不重置滚动位置
})
相对于route还是path:
2
3
4
5
6
/* 在EidtContact组件中调用 */
//被导航到 /contacts
navigator('..', {relative: 'route'})
//被导航到 /contacts/:id
navigator('..',{relative: 'path'})
组件包装器
<Navigate> 组件是 useNavigate的组件包装器, 接受与props相同的参数
用于:
- 当你在类组件中不能使用钩子
- 在某些情况下你需要在渲染时而不是响应事件时进行导航
1 | <Routes> |
异步路由
- lazy包装动态导入
1 | import { lazy } from 'react' |
注意: Page3要默认导出
- Suspense组件包装Routes
1 | <Suspense fallback={<h1>loading...</h1>}> |
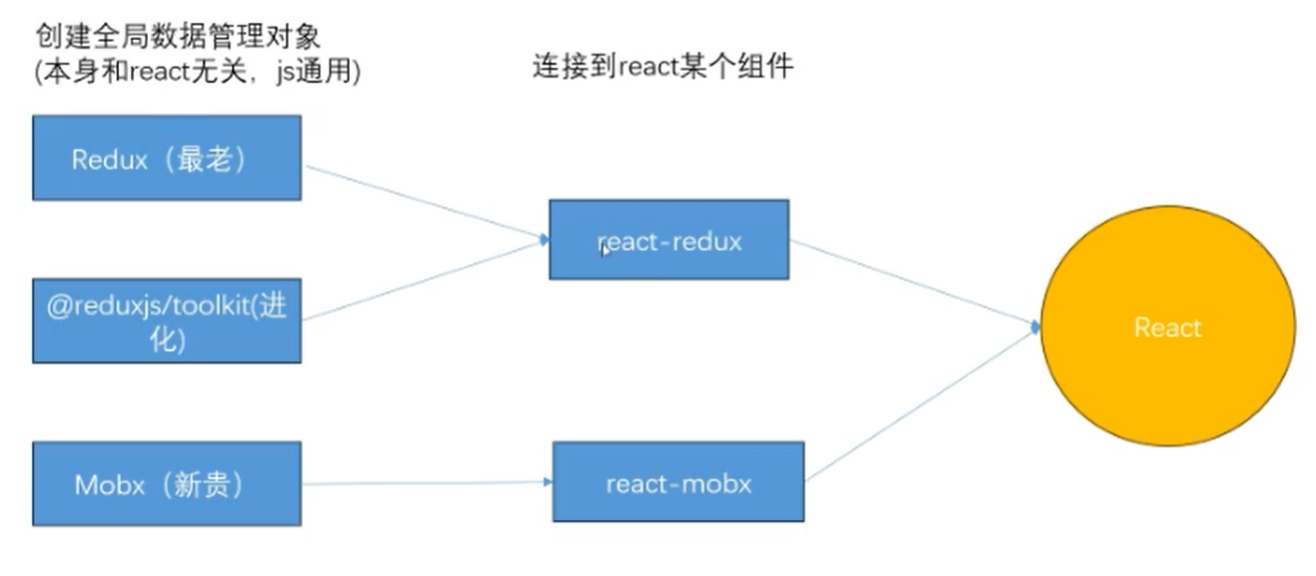
Redux
react没有专门状态管理库,都是js通用的,所以对于数据的修改不能触发更新,需要使用其他工具。
使用步骤
- 利用react-redux引入store
1 | # index.js |
- 利用redux创建store
1 | # store/index.js |
- state通过默认参数初始化
- action就是每次dispatch传递的对象
- case 必须返回一个新对象
- default必须要有
通过react-redux使用store
1
2
3
4
5import {connect} from 'react-redux'
function Test(props){
return (<></>)
}
export default connect()(Test);connect 的作用是把redux创建的store与组件关联起来,使得对于store里数据的修改可以更新相关组件。
原理是调用connect返回一个高阶组件,此高阶组件把store里的数据以props形式传递给组件,而对props的修改组件是会触发更新的。
connect 接收两个参数,都是函数且返回一个对象。
//必须返回一个对象。 connect(state=>state) //可用于筛选出可用对象 connect(state=>{ return {msg: state.msg} })1
2
3
4
5
6
7
8
9
2. ```js
//缺省第二个参数, 则会把dispatch传递给props
connect(state=>state)
//.......调用........//
props.dispatch({
type: 'changeMsg',
payload: msg
})1
2
3
4
5
6
7
8
9
10
11
12
13//封装方法,不再传递dispatch给props,而是传递定义了的方法
export default connect(state => state, dispatch => {
return {
changeMsg(msg) {
dispatch({
type: 'changeMsg',
payload: msg
})
}
}
})(Test);
//.......调用........//
props.changeMsg(msg);
模块化
创建
1
2
3
4
5
6
7
8
9
10
11// 1. 导入不同模块仓库
import countStore from "./modules/module1";
import hiStore from "./modules/module2";
import {legacy_createStore, combineReducers } from "redux";
// 2. combineReducers 合并多个模块仓库
const mainReducer = combineReducers({
countStore,
hiStore
})
// 3. 导出store
export default legacy_createStore(mainReducer)引入
1
2import mainStore from './store/mainReducer'
<Provider store={mainStore}></Provider>使用
1
2
3
4
5
6
7
8
9
10
11
12
13
14
15
16
17
18
19
20
21
22
23
24
25import { connect } from "react-redux"
function ReduxTest(props) {
console.log(props)
return (<>
<div>展示数据: count: {props.count} say: {props.say}</div>
<button onClick={()=>{
props.dispatch({
type: 'add'
})
}}>修改count</button>
<button onClick={()=>{
props.dispatch({
type: 'greeting',
payload: props.say+'!'
})
}}>修改say</button>
</>)
}
export default connect(state => {
console.log(state);
return {
...state.countStore,
...state.hiStore
}
})(ReduxTest)state 下有不同模块对象,每个模块对象下有自己的所有状态。
dispatch 是通用的,如果不同模块都有同一个type, 那么他们都会触发
toolkit
@reduxjs/toolkit是基于redux的
不同点:
默认模块化,需要创建切片再配置仓库
无需考虑type,用action生成器,接收一个参数payload,生成一个action
2
3
4
5
6
7
type: string
payload: any
}
declare function changeMsg(payload: any): Action
//使用
dispatch(changeMsg('newMsg'))支持函数式组件里使用hooks取代connect
1. 建立仓库
1 | import {createSlice, configStore} from '@reduxjs/toolkit' |
2. 引入仓库
同redux
3. 使用仓库
一、connect
同redux模块化
二、hooks式
此方法只用于函数式组件和redux-toolkit中
useSelector选择state
1 | //选择单个 |
useDispatch获取dispatch
1 | const dispatch = useDispatch() |
异步方法
createAsyncThunk创建异步方法1
2
3
4
5
6
7
8
9const changeCountThunk = createAsyncThunk('countSlice/changeNumAsync', async (params, thunkAPI) => {
return await new Promise(resolve => {
setTimeout(() => {
resolve(params)
}, 1000);
})
})
//暴露, 依旧是action生成器
export {changeCountThunk}给指定的切片添加
extraReducers1
2
3
4
5
6
7
8
9
10
11
12const countSlice = createSlice({
name: 'countSlice',
initialState: {count: 0},
reducers: {},
extraReducers(builder){
builder.addCase(changeCountThunk.pending, (state, action)=>{})
.addCase(changeCountThunk.fulfilled,(state, action)=>{
state.count = action.payload;
})
.addCase(changeCountThunk.rejected,(state, action)=>{})
}
})根据promise状态调用对应方法
Thunk的返回值会作为action.payload
调用该异步方法
同上